Published
- 4 min read
Custom built autopilot for flight simulators

My 3D printer was a little bit bored, long time without anything to print.
Recently, I was playing the tutorials of FSX and MSFS2020, so I decided to join both things into one and create a physical device to control the autopilots.
Let’s make it!
Before starting
I checked if there’s something already built to achieve this and I found this wonderful DIY project which served as inspiration: Vizix Autopilot
When you deep dive a little bit on the topic, you discover that everything there is backed up by Mobiflight project.
This project setups an Arduino board to send/receive control commands to Flight simulators: FSX, MSFS2020, X-Plane, etc…
What do we want to control?
We are trying to mimic a real airplane autopilot panel. For example this is the autopilot panel for a Boeing 777:
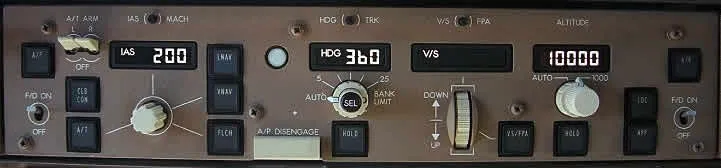
We want to be able to control AP values such as: speed, heading, altitude, vertical speed, etc… We want to have buttons to enable/disable controls, encoders to setup the values and 7-segments to visualize the values.
In a real airplane, this is a very long component. However, due to the limitations of my 3D printer, I decided to stack the components in more than one row.
Bill of materials
From here, we can compile the list of materials that we would need:
- 1x Arduino Mega board
- 8x Switch with LED. It’s important to search for auto-blocking switch because we want to persist the state (enabled/disabled).
- 4x Rotary encoder with push button
- 3x 7-segments display MAX7219. Mobiflight software is only compatible with
MAX7219 - 1x Breadboard. To help with 5V and GND connections
Mobiflight
Once we got all the materials and after a bit of soldering, we can start trying out the configuration of Mobiflight.
The developers of Mobiflight have compiled a very nice set of examples on how to connect multiple hardware:
- LED connection: we can use this example to connect one switch LED light to display if the parking brake is enabled or disabled.
- Switch: the previous example powers a LED when the parking break is on. In this example we use the switch to set or un-set the parking break (and the LED).
- 7-segment display. We can use this example to show
COM1Radio frequency in the 7-segments display. This is by far the most challenging part. When you connect the 7-segment display, you need to restart the Arduino board and the Mobiflight software; I think this cause because there are some issues with the 7-segments and initialization of the Arduino board.
It was a little bit difficult to troubleshoot the connection issues when soldering the cables. In order to let Mobiflight out of the equation to discard issues with 7-segments, I found this tutorial where the 7-segments is configured directly into the board.
Once I soldered the cables I first run this little Arduino program to confirm all the connections worked fine, once confirmed I configured Mobiflight.
3D Printing
This phase really depends on the features of your 3D printer. In mine I couldn’t print a much wider component, therefore I decided to stack the components in some rows.
To design the components, I used tinkercad which is free and very convenient to use to design 3D components.
I split the whole component in two parts: the front cover and the box. The components will be connected using bolts.

The box has a small hole that fits the Arduino USB port and it’s used to power up the device and to connect it to the PC.
The box took 24h to print and the cover was 4-5h aprox. Given the amount of time to print, it was very useful to work on every type of hole separately: it was a matter of 5 minutes to make a small print to test each hole.
Connections
Do small tests
I’m a software developer, so I’m used to do small tests to test my software, so I applied the same concept here.
Whenever I solder some device (the LED button or the 7-segment display), first I do a small test to make sure the device works.
Be very organized
The amount of cables that this project has is huge!

The only way to make this work is to be very organized and define a color code for the cables.
Besides that, keep a note of where you connect each device pin to each Arduino board pin because you’ll need it to configure Mobiflight.
You can check how it’s done in my case here
Testing, testing, 1, 2
This is the result of all devices connected to Mobiflight in test mode: